Ok, with these unorthodox building materials it seems that you learn as you go: The mesh tubing wasn't working out quite the way I'd hoped. The bottles tended to shift inside the tube so that they wouldn't lay flat once they were moved. Also there were substantial gaps in between the top of one bottle and the bottom of the other. I needed something that would insulate better and that was easier to work with and construct. So I thought and experimented, thought some more and experimented some more, and finally I think I have it! The building process is as follows:
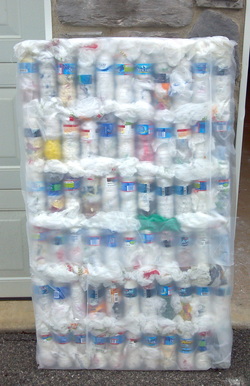
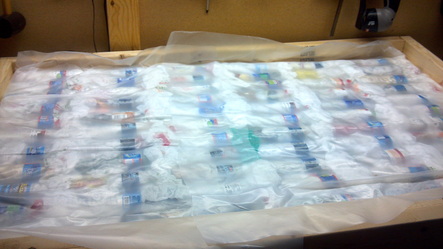
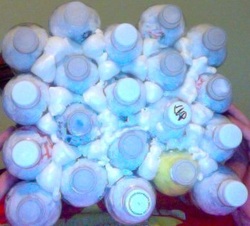
- I created a 4' x 2' 4" wooden frame to keep the bottles aligned while making an insulation panel.
- I lay a 3' x 8 1/2' sheet of 4 mil plastic sheeting in the bottom of the frame with the overlap hanging out.
- 66 bottles fit inside the frame and I use spray adhesive to stick them to the bottom plastic as I insert them.
- Plastic bags are stuffed between any gaps such as the gap around the cap of the bottles
- The tops of the bottles are sprayed with adhesive and then the sheeting is folded over, sealing the bottles within.
The picture below shows the bottles in the frame.
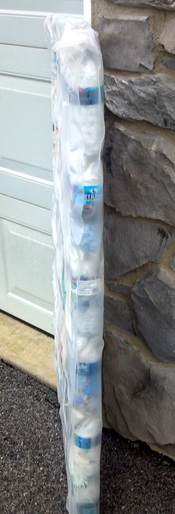
The resulting panels are uniform, light and easy to handle. They will be tied to the earthbags and then covered with either hardware cloth for plastering or an additional waterproofing layer. I also believe that these panels will be much better at insulating the walls than the mesh bags. Who knows though: I may be changing the plan again!
Well, the school year is finished and therefore so is my collection period for water bottles. By estimation I have approximately 6,000 bottles to show for a little over 2 months. I could never have come close to that number without major assistance from faculty members, parents and students! Thank you all!
As impressive as that number is it is still less than half of what I needed for the original plan. With the 6,000 bottles I had two options (I don't have time for continued collection). I could have covered half the wall in the bottle blocks and used another method for the other half or change the arrangement of the bottles to allow for full coverage with lowered insulation value. As this cabin will mainly be a three season retreat, I opted to reorganize the bottles. I can always add more insulation later if needed.
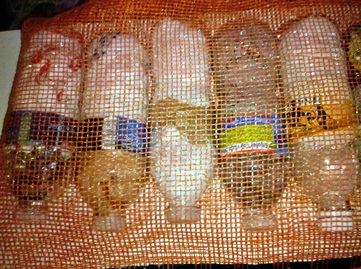
The new plan is to take the bottles and attach them end to end in long rows. The long rows are fastened together with plastic wrapping and then they are inserted into the same mesh tubing that we will be using to build with (I should have plenty of extra). See the picture below but imagine the bottles in an eight foot tube.
This will considerably reduce the R-value (insulation value) since we are going to be laying the bottles against the side of the wall instead of pointing them out. The insulation thickness goes from 6+ inches of plastic and foam down to about 2.5 inches (the width of a bottle). Oh well.
There are some benefits to this method though. One, the use of the foam is no longer necessary so the cost goes down and the insulation becomes "greener." Two the mesh bags will allow better adherence of the plaster which will eventually cover the walls. All in all I feel very good about what we have done. 6,000 bottles and 18,000+ plastic bags out of the waste stream or without the energy costs of recycling is nothing to sneeze at! Keep checking back to see how things are shaping up.
An inherent quality of building with earth is the tendancy of the material to resist rapid changes in temperature. Cold earth wants to stay cold while warm earth wants to stay warm. It takes a great deal of energy to force the temperature shift in one direction or another. However, once you have, it will stay that way for quite some time. This can be both a benefit and a curse depending on the prevailing climate.
Our cabin will be mainly used in the spring and summer but there will be times that we need it during the colder months. In the mountains of Pennsylvania this cold can be quite extreme. In an uninsulated earth cabin we would be faced with a constant need to burn fuel for heat as our interior temperatures attempted to win out over the prevailing exterior temperatures. Two solutions are possible for this problem. The first involves filling the bags themselves with insulation such as scoria, vermiculite, rice hulls, etc. The second involves insulating the outside of the earth structure. Thereby seperating the two temperature extremes and allowing the walls to retain their heat longer. There is a great
blog post and related instructable created by Dr. Owen Geiger on this process.
We will be using the exterior insulation method since scoria (lava rock) is rather expensive here in PA and lightweight insulators like perlite would require a wooden frame of some sort. Our unique insulation will be mainly built out of plastic "trash". Specifically, massive amounts of plastic drink bottles and plastic shopping bags are the prime materials. The basic process is outlined below:
- Stuff a 16 - 20 oz. plastic bottle full with plastic bags (usually 3-4) and screw the cap back on.
- 20-25 of these stuffed bottles are squeezed tightly into a form. I use a milk crate-style container with the bottom cut out.
- Squeeze small amounts of expanding spray foam in between the gaps of the bottles. If you have compacted the bottles enough in the form this doesn't take much. Also I use the Great Stuff Big Gap Expanding Foam which really fills the space well.
- Allow the foam to finish expanding and setting and then remove the "brick" from the form. See the photo below.
- These bricks can then be mortared together with a natural soil based mortar.
The plastic bricks will be attached to the walls with nylon twine and covered over with plaster. This design reuses thousands of bottles and bags and I hope that it will do an adequate job insulating the walls. The entire job is a lot of work! Collecting the materials alone is a huge job. Luckily for me I am a school teacher and everyone (faculty, students, and the families) at two of our district schools is being such a help and support. I even have my eco-conscious students voluntarily giving up recess to help me stuff bottles full. Certainly without this help I would never be able to do it.
 RSS Feed